
Echosorption PLUS Installation Guide
TO VIEW / DOWNLOAD THIS DOCUMENT AS A PDF PLEASE CLICK HERE
Tools required:
Tape measure
Cotton Gloves
Sharp Knife (at least 150mm long)
Straight edge (at least 1200mm long)
Pencil
Steps or Tower Scaffold of suitable height
Echosorption Plus acoustic tiles are easily bonded to walls and ceilings with any good quality contact adhesive.
The tiles and adhesive must be kept and stored inside at normal room temperature at all times and fully acclimatised in the area they are to be installed for at least 24 hours before fixing. To avoid soiling the absorbers, cotton gloves should be worn when handling them.
The substrate must be clean, flat, dry and free from oil, dust and grease or any other residue that could affect the bonding of the tiles.
It is important the ceiling or wall where the tile is to be fixed is coated with the adhesive used and according to the instructions on the can. Also the entire back face of the tile is coated but more generously with the adhesive which should be a spread on contact adhesive out of a can. If working in warm conditions, the time taken for the adhesive to reach a ‘’tacky’’ state will be reduced so bear this in mind when fixing to the prepared substrate taking care to position the tile correctly. If working in cooler temperatures, be sure to allow the adhesive to dry until ‘tacky’ before installing that can take a bit longer.
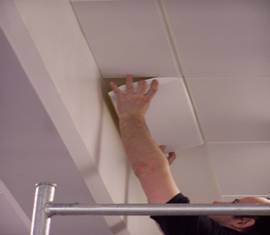
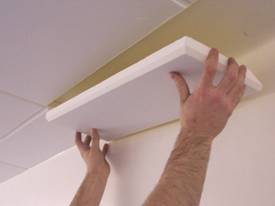
When both surfaces have been properly coated with the adhesive and it has reached the right degree of tackiness, place the panel into position and ensure the tile is properly fixed by pressing with the flat of the hand over the entire surface area of the tile. It is extremely important this is done correctly because failure to do this properly could result in the tile detaching itself in time due to poor adhesion. When this happens, some of the back of the tile will be left adhered to the ceiling and from that you will be able to see where the tile was not properly glued. Do not push the tiles too hard otherwise damage to the surface could occur but it is very important that the entire tile is properly bonded to the ceiling or wall.
If a tile is applied too soon the bond may fail and if it is applied too late, the adhesive may be too dry to affect an efficient bond. It is always better to fix these tiles onto unpainted surfaces whenever possible because painted surfaces can be insecure resulting in tiles and paint detaching themselves in time. If the surface is painted then it is best to treat the painted surface beforehand with a dilute PVA solution to ‘fix’ the paint to make it more secure and less likely to fail.
In normal room temperatures, an immediate bond is obtained when sticking the panel so it is important to align the product correctly before pushing the panel into place. It is important the adhesive has reached the correct stage of tackiness before applying a tile.
BECAUSE MOST CONTACT ADHESIVES ARE SOLVENT BASED, THE AREA SHOULD BE WELL VENTILATED AND WE ADVISE LEAVING THE AREA VENTILATED FOR AT LEAST 2 HOURS AFTER THE WORK HAS COMPLETED BEFORE ALLOWING ANYONE TO USE THE ROOM.
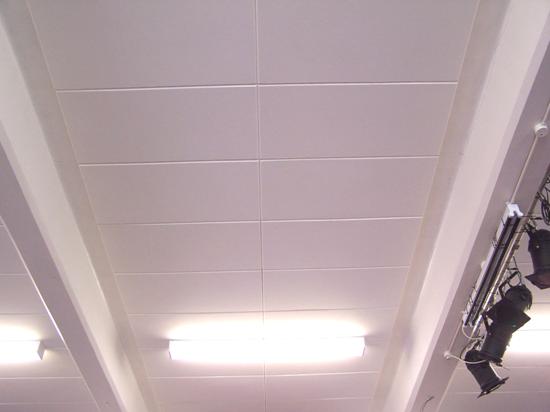
Finished results should look similar to the picture below
Every effort is made to ensure the information given here is accurate and reliable but is to be used only as guidance. As each application can be different, users are advised to conduct their own tests to confirm suitability. As our policy is one of continuous development and improvement, we reserve the right to make changes without prior notice.

