
Soundproof Separating Stud Walls To Meet Part E
How to meet Part E 2003 Resistance to the Passage of Sound with SOUNDPROOFED lightweight stud partitions for separating walls between dwellings.
Lightweight stud partitions are often used to separate flats because they are lightweight in structure and quick and easy to construct. Particularly useful on commonly shared timber suspended floors and ceilings. The current sound insulation requirements for separating walls are as follows
Change of use or upgrade existing 43dB or above
Purpose built 45dB or above
These walls also have to be tested to prove compliance so it is better and cheaper to get it right first time.
Before starting to construct the walls, steps have to be taken to stop flanking noise skirting under and over the new wall if the floor and ceiling are timber suspended. If the building is being converted into flats it is likely these areas have already been treated but if not, proceed as now described assuming the floors and ceilings are not separating other flats.
Flooring
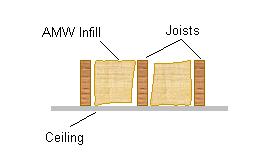
Lift the floorboards and if the joists are running parallel to the proposed new wall, install AMW Acoustic Mineral Wool either side of the supporting joist from ceiling to joist height then replace the floorboards.

If the joists are running perpendicular to the proposed new wall, simply install the AMW where the wall is going to be above and it is best to install the AMW in the 1200mm lengths it comes in suitably cut to size as a loose fit between the joists using a long bladed sharp knife.
Ceilings
Ceilings should be treated in exactly the same manner and it is usually easier from above unless it is a loft. With lofts is is usually better to install the usual fibreglass type loft insulation, then board the loft out with 18mm t&g flooring followed by more loft insulation to comply with current Building Regulations for thermal insulation.
Separating floors and ceilings
If the floors and ceilings are separating other flats, these should be upgraded to comply with Part E prior to installing the separating ceiling but before any floating floors or Resilient Bar sprung ceilings are fitted. In these cases, the separating wall should be constructed on top of the base floor before the floating floor goes down and up to the underside of the ceiling joists before the resiliently sprung ceiling is installed. For more information on these click the following links to give access to our R10 floating floor system and Resilient Bar system for ceilings.
R10 – http://www.soundservice.co.uk/R10_index.htm
Resilient Bar - http://www.soundservice.co.uk/resilientbar.htm
Supporting Walls
We have discussed avoiding flanking noise through timber suspended floors and ceilings but we have not yet discussed flanking noise round and through supporting walls. If the supporting walls are timber stud, these should be infilled with AMW and double clad with Acoustic Plasterboard before commencing installation of the separating stud wall. With masonry walls including a cavity, the best solution is to infill the cavity with blown mineral wool type thermal insulation. This will increase the thermal efficiency of the building and at the same time, help to absorb noise that would otherwise flank along the cavity.
Separating Wall
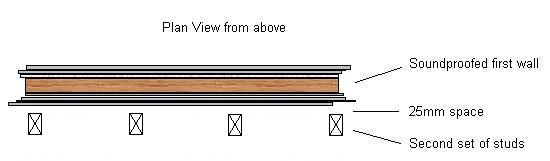
Now we will discuss the timber stud type separating wall which will comprise two walls separated by 25mm. This will take up about 11.5 inches (280mm) and is described as follows in stages.
1. Start the first wall by installing the first set of studs using 75mm timber or metal stud. In both cases, use a double thickness of 75mm timber stud for the top and bottom plate.
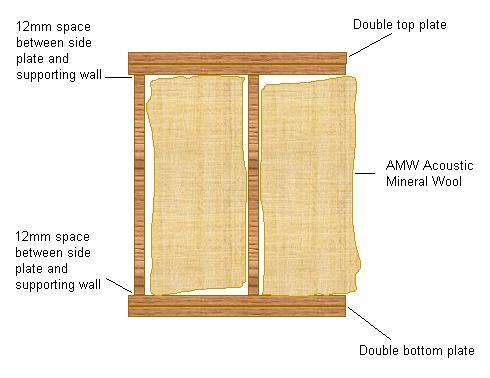
2. Install the vertical sections at 600mm centres ensuring the ones closest to any supporting walls are 12mm away from those walls. Do not install any noggins!
3. Infill between the stud using 75mm Acoustic Mineral Wool
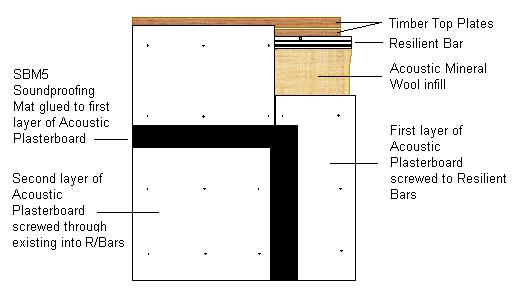
4. Screw 15mm Resilient Bars across the stud at 600mm centres from floor to ceiling on both sides.

5. Screw two thicknesses of 12.5mm high density Acoustic Plasterboard to the bars ensuring the screws do not come into contact with the supporting stud with one layer of 2mm SBM5 Soundproofing Mat sandwiched between the layers as shown below. Be sure to keep a gap of about 2mm where the plasterboard meets walls, floors and ceilings.
6. Seal the edges of the plasterboard where it meets the floor, ceiling and supporting walls with Acoustic Sealant and tool smooth.
7. Make good the joints by taping and filling as necessary.
That’s the first wall completed, now for the next wall.
1. Fix another set of top and bottom plates 25mm away from the first wall along with more vertical studs at 600mm centres as shown below.
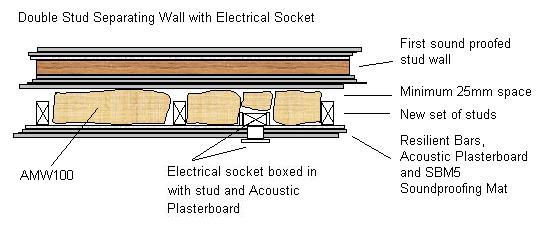
2. This time infill with 100mm of AMW100 Acoustic Mineral Wool
3. Screw on another set of Resilient Bars as before
4. Screw to the bars another two thicknesses of 12.5mm Acoustic Plasterboard not forgetting the SBM5 sandwiched between the two layers.
5. Finish the joints and seal the edges as already described above.
Note! Avoid fitting any electrical fittings or sockets to these walls because that will reduce their soundproofing efficiency. If they do have to be fitted, use shallow inset boxes and ensure they are totally encapsulated with timber stud behind the boxes and seal with Acoustic Sealant as shown.
What we have described above is a lightweight stud separating wall that if properly constructed will easily comply with the Part E 2003 requirements for the control of noise through separating walls. The specification exceeds what is detailed within the document because those details do not always comply and sometimes are found to fail the required pre-completion testing. For more information on Part E, click the following link to download the entire document.
http://www.planningportal.gov.uk/uploads/br/BR_PDF_ADE_2003.pdf

